Unique Furniture Design

Hi and welcome to my webpage,
Here is a little background of the sleigh bed, why it looks the way it does and what materials I used to make it.
This bed was to be mine so it reflects my style.
Then friends of mine got married and I thought it would be a nice gift to give this bedframe to them as a wedding gift.
A few years later I moved across Canada from Ottawa to Victoria British Columbia which is about 3000 miles and I moved all those pieces.
I worked at Thetis Cove joinery, and great company with extremely skilled cabinetmakers
From there I continued working on the bed frame, the owner, Jack Bell was extremly generous in allowing me to use the shop for free.
Not many owners would do that and I appreciate everything he's done for me.
Seeing as I could only work on this project in my spare time it took a very long time infact it took three deadlines for me to finish it.
In order to finish it on time I had to work till 2:30 am, slept an hour and a half then back to the shop to finish it.
I stained the pieces and sprayed the laquer and I finished with 5 minutes to spare (too close for my comfort).
I had to finish it or else Jack Bell was going to burn the entire bed which was the agreement!
Now some of you might think that it's a little rough.
You have to understand that Jack Bell let me store all the materials for over 2 years and that all this material was taking up space in his shop.
When I was finally done, I was excited to tell my friends that the bedframe was completed,but by that time their finances weren't good enough to come and pick it up.
Remember, we're talking 3000 miles!
On a side note, this bedframe has moved a lot - 10 500 miles from Ottawa to Victoria, back to Ottawa, back to Victoria, then Calgary Alberta, and finally in Victoria where it now remains.
My wife and I recently moved to Winnipeg, Manitoba and I left it with my best man Ryon Bell for now.
This bed is made of three types of wood namely maple, birch, and cherry.
This furniture was time comsuming because at the start of the project I decided to skip the layout, big mistake!
A layout is basically a drawing like the autocad drawings below but only in 2D, the importance of making a layout is that you can figure out the angles, dimensions and you can solve most of the potential obsticles before you start your build.
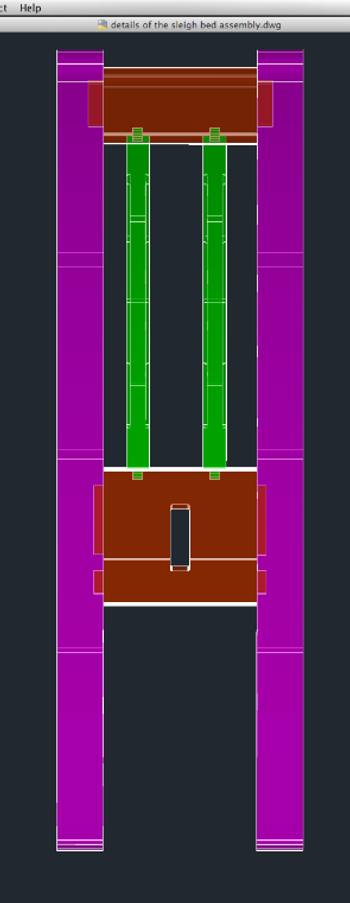
Now this bed is assembled with tenon and mortise assembly, below is a drawing to demonstrate.
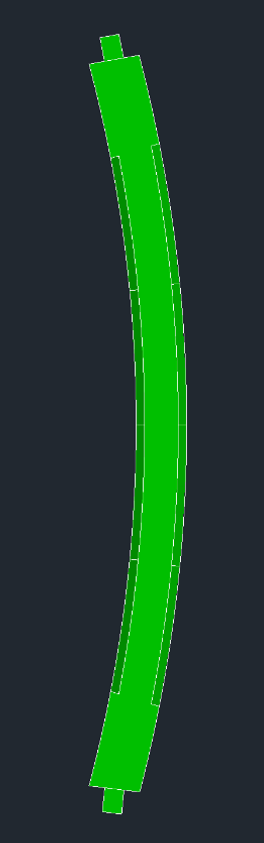
The Tenon is the green piece that goes into the brown horizontal piece.
That was the most difficult part of this project.
The Mortise is a square hole that accepts the Tenon.
The Tenon was so hard that I challenge anyone to figure out how I did it, so that every piece is perfect and doesn't have any gap with the horizontal pieces. (the brown pieces of wood above right drawing).
If you don't believe me try drawing a simple pencil mark around a 2X4 (or whatever you have available). The challenge is to start a line and keep going around the piece of wood and see if the lines match.
If you can, that's really good but these pieces are curved which is a lot harder.
This problem took me honestly over 50 hours to figure out how to do it in order to have each piece perfect.
I should mention that the angle for the Tenon at the top is different from the bottom of the head board and the footboard has two different angles.
I'll keep that secret to myself but you're more than welcome to try to figure out how to do it.
Now it's worth mentioning that there are 13 pickets for the headboard and the same amount for the footboard.
That's 8 cuts per picket and a total of 4 different angles, and they of course must be the same dimensions (length) or else it wouldn't be perfect.
So 52 cuts per angle and a total of 208 cuts to do all 26 pickets.
There's a reason why companies don't make furniture this way anymore.
It costs too much to make and too time consuming but thanks to CNC machines, manufacturing time is cut by about 1/2 the time for intricate designs.
Now the horizontal railing that accepts the tenon via mortise was chiseled by hand that's 52 mortises.
At the end of these horizontal pieces you have to make tenons like the drawing above that will go into the legs of the bed.
Now these are straight pieces, so no problem there's a multitude of ways of doing it and I chose a table saw.
Next step is to make the mortises that go through the lower horizontal pieces to accept the mattress railings.
I chose to make 3 of them so 6 through mortises and because the headboard and foot board are different angles you have to make sure that when you make the mortises, those mortises are in the correct angle.
Otherwise, the mattress railing won't go through, and if you do make a mistake the hole becomes too big and sloppy to receive the mattress railing and that wouldn't be professional.
Next step is machine the legs and chisel the morteses and your ready to dry fit (no glue - it's just to make sure that everything works before you glue).
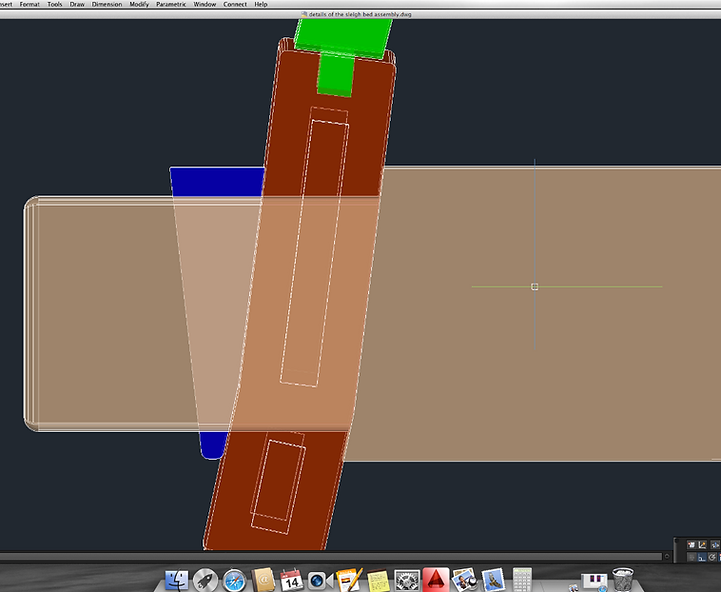
Once the headboard and footboard fit properly, you figure out the angle to notch the mattress railings and remember the front and back are different degrees. Once you've got the angle, you can make the Tenons that go through the horizontal mortises like the picture below where the mattress railing is in beige.
If it all fits perfectly you can now make the wedge (which is blue in the photo below).
Once the shape matches the horizontal piece, you can chisel for the wedge that will lock the mattress railings.
Don't forget that the headboard and footboard are different angles.
At this point you can dry fit everything and it was exciting for me because I could see the fruit of my work.
I then had to make the mortise that goes through the legs and at this point I realized that the bed weights over a hundred pounds.
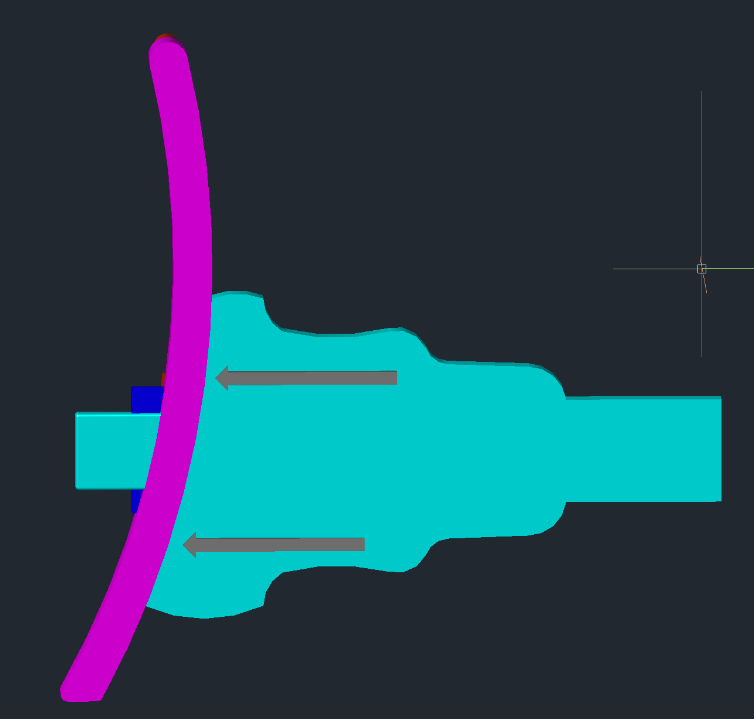
I needed to beef up those railings to the legs so I came up with the design below.(in green)
I had to remember again that the curviture of the footboard and headboard are not the same but at this point it was a lot easier.
Again once the mortises were chiseled out and dry fitted, I had to chisel to accept the wedges that were going to lock the headboard and footboard together - basically locking the entire bedframe together as one piece of furniture.
Now this is only a quick AutoCAD drawing so the angles are not accurate, I simply made it as an example.
The arrows show the beefing of the side rails making the Furniture design visually pleasing and a lot stronger.
Finally, you might think all the pieces are complete and now it's ready to glue up but unfortuneatly I needed to add two more railings to help support the mattress.
I had to glue another railing directly against the outside railings (the yellow piece below).
Now the bedframe weights more so I decide to make two braces to go underneath the mattress rails (never ending project!).
I've put a lot of work into this and I wanted to make sure that it lasts.
Only after I had the shape and machined and glued (the yellow piece above) did I realize that I had to notch it to recieve the red piece in the picture above.
Am I ever going to glue this thing up, I thought.
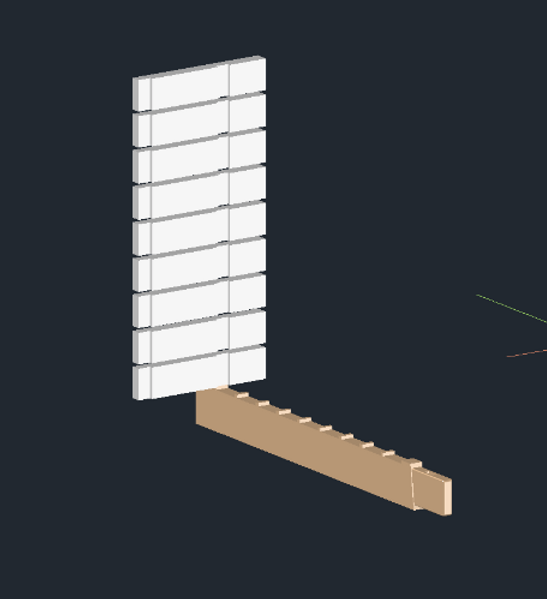
In the picture above I notched for the mattress railing in beige and the notched 2X4's in white.
That's 22 times notches for the matress railing to accept 22 pieces of 2X4's.
Now came time to notch for three matress railings on 22 pieces of 2X4's
I was finally ready to glue the headboard and footboard, so I got some help from my buddy Ryen Bell ( who later on became my best man at my wedding).
This was the only help that I received in the entire build.
We had to put glue in 26 mortises and apply the pickets in every hole then clamped the footboard so that it'd stay as one piece.
That took over 6 minutes then we had to put glue in the mortises of the legs and then clamp the legs to the rest of the footboard together.
Then tighted all the clamps tight and made sure that everything was square.
That dry time simply means that the glue gets dry enough that if you keep playing with you work longer then 10 minutes the glue will crack and will no longer be strong.
Then the same procedure was done for the headboard.
I then went around with my measuring tape to make sure everything was square and true.
The next morning Ryen and I showed up at the shop earlier because we had to take the clamps off and clean up the area before we started work.
I had two weeks to clean off the glue, and sand everything to get it prepped to stain and laquer for the deadline.
No big deal right, except there wasn't much room in between the pickets to clean up the glue, and if there's any glue residue on the wood when you go to stain it will show up.
I had 58 pickets gaps to sand and make sure that I removed all the glue.
That took about a week and then I had to sand the rest of the bedframe because I didn't skimp on the glue in the mortises.
That took another 4 nights, then I could sand the entire bed by hand going with the wood grain.
Here are the different pieces of this Unique Furniture Design of course there are many more pieces in the actual bedframe.
This wasn't planned but because of the shape and angle, the 4 legs look like they are warpped if you stand at a 45 degree angle and look down.
The first time I noticed, I freaked out,I thought I had to redo all four legs.
Thankfully it was only an optical illusion.
So this seemingly easy bedframe design is quite intricate and I can guarantee that no one on the planet has an identical bedframe.
In this world of disposible furniture, isn't it nice to know that there are a few skilled tradsmans that bother to do things that reflect our profession.
Finally, I was able to draw all the components of this bedframe in AutoCAD in about 4 hours.
Thank you for bearing with me through this dry, boring story about this bedframe.
Story behind this bed frame